The data.bris publication process
Overview
- Step 1: Register as a Data Steward (an authenticated user) of the Research Data Storage Facility (RDSF)
- Step 2: Register one or more research 'projects' and request the required storage space for each, up to a combined total of 5TB per Data Steward.
It may then take several days for your storage to be allocated (see How to access and use the RDSF) - Step 3: Map your RDSF storage space as a drive - Mapping your RDSF storage space as a drive in Windows (PDF, 486kB)
- Step 4: Copy the data you wish to share into your pre-made ‘Data-Bris’ folder. At present, a Data Steward can publish up to 100GB of data per RDSF project
- Step 5: Describe your data:
- Go to http://data-bris.acrc.bris.ac.uk/ using a desktop or laptop machine (mobile devices do not work for this).
Remote/off-campus devices can be used but you’ll have to connect via the VPN (see Remote access - Working away from the University). - Complete a Deposit Record to accompany data you’ve copied to your Data-Bris folder. You can create more than one Deposit Record, if you’re describing several different datasets.
- Go to http://data-bris.acrc.bris.ac.uk/ using a desktop or laptop machine (mobile devices do not work for this).
- Step 6: Request publication of your data and Deposit Record. This will send a message to repository staff that your Deposit Record and data are ready to be checked
Once your deposit has been verified and published, your Deposit Record will be copied to Pure, the University’s Research Information System. It will also be openly visible online in the data.bris repository catalogue, the Bristol Research Portal, and the DataCite registry. If you chose to make your deposit 'open' your data will also be made available.
You’ll be issued a unique British Library DataCite DOI for each separate deposit you publish, which can be used in published papers' Data Availability Statements.
You cannot edit your data after publication. However, you can choose to edit the data record in Pure. This is particularly useful if you want to relate your dataset to your publications and projects, e.g. to link your datasets and articles/papers together in Pure, or to link your datasets to your projects in Pure. Any changes you make will be checked by a member of repository staff, and if approved will be pushed back to the data.bris repository catalogue, the Bristol Research Portal, and the DataCite registry.
***To access the RDSF for data publications, you must be on a UoB networked PC, or the VPN, and will need to have the project mapped to your drive.***
Step by step guide
For more information on the publishing process, watch our short video or see below for a detailed guide to each step.
Step 1: Register as a Data Steward
You can skip this step if you’ve already registered with the Advanced Computing Research Centre (ACRC) as a Data Steward.
In order to publish your research data via the data.bris Research Data Repository you must first become a Data Steward (an acknowledged custodian of research data); you will only ever need to do this once. Registration is managed by the ACRC.
- Visit the ACRC's Applying for Research Data Storage web page:
https://www.bristol.ac.uk/acrc/research-data-storage-facility/apply-to-use-the-rdsf/
and complete the form to register as a Data Steward.
Step 2: Register one or more research ‘projects’
You can skip this step if you’re a Data Steward and have already registered your research project with ACRC.
Each Data Steward is able to register multiple projects, though the total space allocated must be within the initial allocation of 5TB. If you require more storage space, you may have to pay - please contact ACRC for more information.
- Complete the ACRC form to 'register a standard project'. You will be asked to provide details such as an estimation of how much storage space you will need, which computers you plan to access the storage space from, and the names of any internal University of Bristol collaborators with whom you intend to share access to your storage space.
Once your registration has been processed (n.b. this may take several days), you’ll be emailed to let you know when the storage space has been allocated.
Step 3: Map your RDSF storage space as a drive
There will be a number of ways to access the storage. Many users decide to map the storage as a network drive within Windows. However you decide to access your storage space, you’ll notice it will have been given same the name as the research project you registered. Importantly you'll find within your storage allocation a folder called 'Data-Bris' which has been created for you.
If you have any difficulty accessing your storage area or questions about any part of the project registration process please contact the staff at ACRC: hpc-help@bristol.ac.uk.
You need to be connected to the University Campus network to access the RDSF, when not on campus you will need to connect to the VPN.
On a PC
- From Windows Explorer access or map a network drive to:
- \\rdsfcifs.acrc.bris.ac.uk\My_Project Note: Replace 'My_Project' with your project name
- If prompted for a username to access the RDSF folder use the
format: "uob\your-uob-username"
On a Mac
- In the Finder select 'Go>Connect To Server...' (or press CMD-K)
- then enter: smb://rdsfcifs.acrc.bris.ac.uk/My_Project
Note: Replace 'My_Project' with your project name.
Step 4: Copy your data into your data-bris folder
When you have reached the point where you want to deposit and ultimately share research data using the data.bris Research Data Repository service, ensure your data complies with the Data Preparation Rules.
- Copy the data you'd like to share into your 'Data-Bris’ folder (shown below).
By default you are able to publish any number of datasets up to a combined size of 100GB per project. However, subject to prior discussion, it may be possible to increase this limit, should you need more space. We'd recommend creating a subfolder inside Data-Bris for each new dataset you publish.
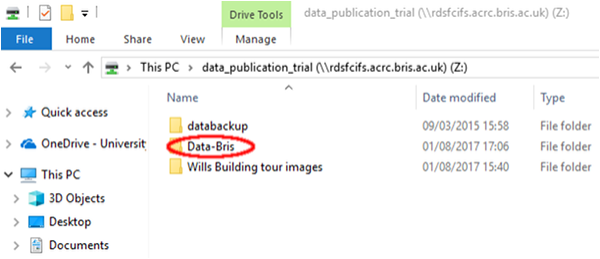
Figure 1: Copy data into the marked 'Data-Bris' folder
Once organised within the Data-Bris folder your data is now within the repository system. However, it can't be published until you've completed a Deposit Record which describes your data.
If you have any questions about this step please contact: data-bris@bristol.ac.uk
Step 5: Describe your data
In this step, you create a Deposit Record and specify which data the Deposit Record relates to. This process allows you to associate some data with one record and other data under a different record, as required. A unique DOI will be assigned to each Deposit Record and its associated dataset.
- Log into the data deposit system with your University username and password at http://data-bris.acrc.bris.ac.uk/ and click on the name of your project. At this point, you’ll see some high-level information about your project’s storage space.
- Click on the 'Deposit data for publication' button, and you’ll be presented with the University’s Research data deposit licence agreement. Please read through the terms of the licence, and if you agree, click ‘Accept’. Acceptance of the licence is mandatory if you wish to deposit.
- After accepting the licence, you are taken to the Deposit Record Form. Some of the fields in the form will have been filled in by default, others you will need to complete manually. Completion of some fields is mandatory; these are signified with an asterisk.
- When you’ve completed the form (you can return to the form and change things later, if you need to) select 'Save changes'.
For more information on the contents of each field in the Deposit Record, see our Deposit Record field guide.
Once you’ve completed the Deposit Record form and selected 'Save changes', you are presented with a list of all the Deposit Records you have made, or are in the process of making.

Figure 2: List of deposits
Next, you associate your new Deposit Record to some or all of the data within your data-bris folder.
- Click on the 'Choose Content' button (circled in Figure 2 above) next to the Deposit record you just created.
- You'll be presented with a list of all the folders that are inside your 'Data-Bris' folder. Please note that only the first 25 folders will appear, due to display limitations.
- Click on the radio button to the right of any folders that you want to associate with the current Deposit Record. When you’ve finished click on ‘Use selected folder’ located at the bottom of the page (circled in Figure 3 below).
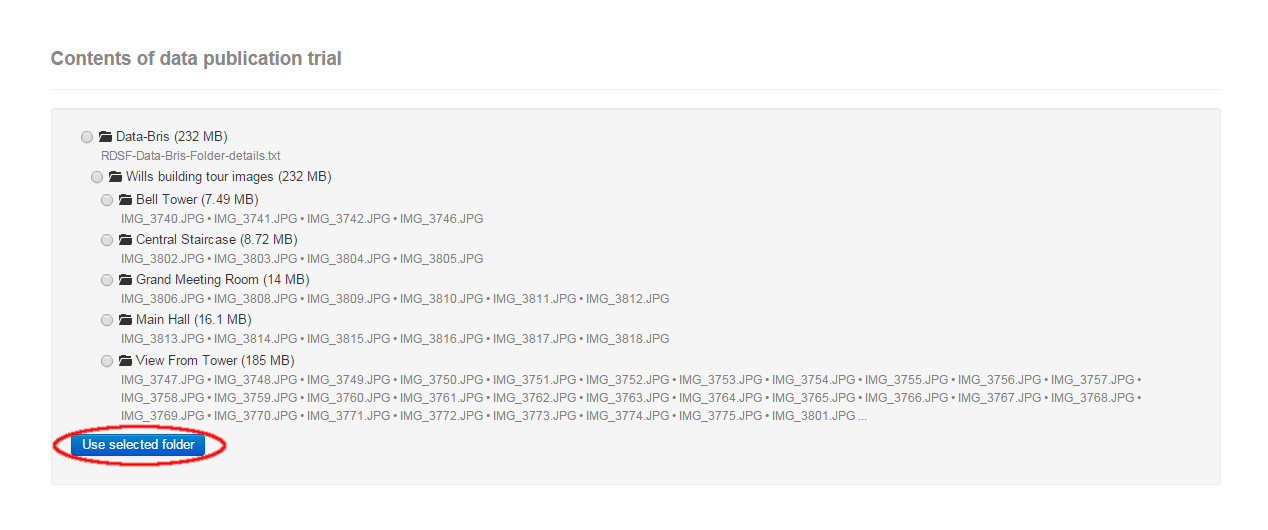
Figure 3: Selecting files and folders to associate with your deposit record
You will now be taken back to your Deposit Record which will have content attached to it as shown in Figure 4 below.
All the items which you’ve associated with this particular Deposit Record are listed at the top under the heading 'Current content'. You now have four choices:
- If you’d like to associate more items with this Deposit Record, click once again on 'Change content' or 'Change' button
- If you have changed any of the data associated with your Deposit Record since you associated it, click on the 'Synchronise' button to ensure that the changes are updated
- If you’d like to change some of the information you added to the Deposit Record Form click on 'Edit record'
- If you’re happy with your deposit click on 'Return to deposits list'
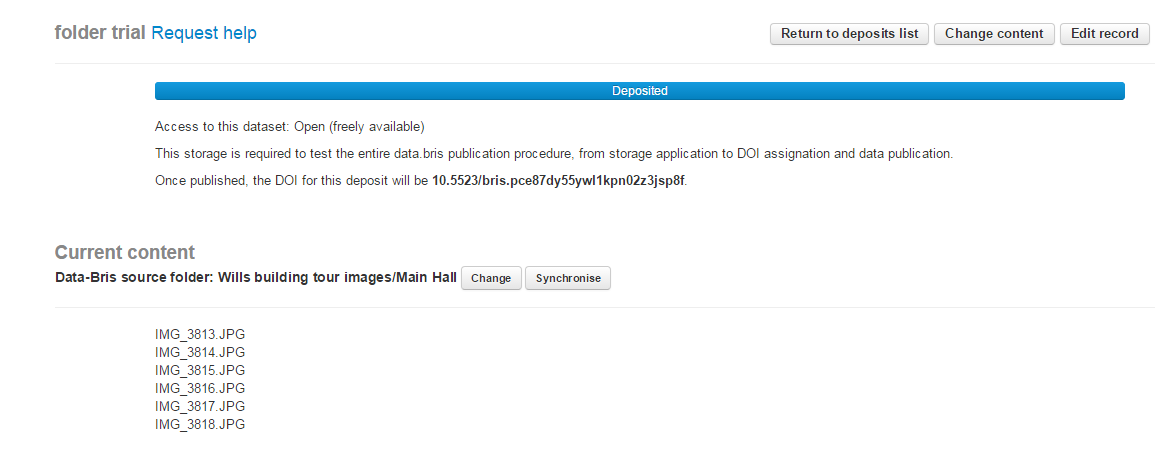
Figure 4: Sample deposit record with attached content
Step 6: Request publication
When you return to your Deposits List, a new 'Request publish' button will have appeared next to your current deposit, as shown in Figure 5. This indicates that your Deposit Record has been successfully associated with your research data and the whole deposit can now be submitted for publication.
- If you select 'Request publish', repository staff are notified; they will check the deposit is ready to publish, including checking the folders and the readme.txt.
(n.b. a text file named specifically readme.txt must be included in the upper-most folder for each deposit)
You’ll lose the ability to make changes to your deposit at this stage, so please make all necessary changes before selecting 'Request publish'. - Alternatively, if you select 'Delete record' the Deposit Record will be deleted (any associated data will not be deleted, only the Deposit Record)

Figure 5: The 'request publish' button becomes available once the Deposit Record is complete and data have been associated with it
When your deposit has been checked and approved, we’ll also issue you with a DOI and citation via email. This will happen within a few days. Please note that if your dataset contains information on human participants, it will undergo additional disclosure risk assessment checks which may extend this timeline. Your DOI and/or citation can be used to populate a Data Access Statement, which is recommended.
We provide long-term maintenance of your data, so you can safely cite the DOI within any kind of publication as a convenient way for others to access your data.
Once you have your DOI you can delete the data you have published from your data-bris folder, as the repository now has a copy of it. If you have any questions about this step please contact the repository team (data-bris@bristol.ac.uk).
Adding other datasets and linking in Pure
A copy of your data.bris dataset record will be mirrored in Pure. You can add connections between this Pure record to your other records in Pure: research outputs, projects, events, etc.
If you have external datasets published elsewhere that you would like to appear in Pure and Bristol Research Portal alongside your data.bris deposits and other research outputs, email data-bris@bristol.ac.uk to have these added to your record.