SafeZone for lone working
Introducing SafeZone for lone working
The SafeZone app is designed to support and enhance current lone working arrangements at the University, for example, by:
- enabling building managers to see who is in a building outside of core hours, in real-time
- asking staff who are lone working to check in on the app after set time intervals
The role of SafeZone is to improve staff safety and ensure the University delivers on its duty of care.
SafeZone is now available for all staff at the University.
How to use SafeZone
Follow the instructions below.
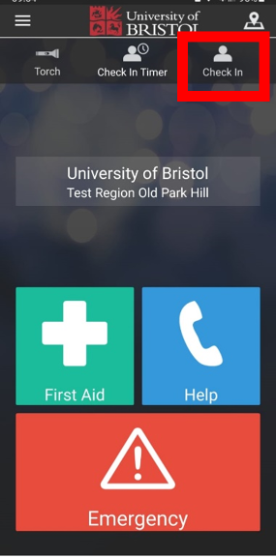
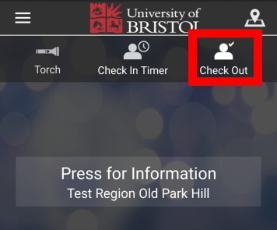
Using the Check In and Check Out buttons
When you are beginning a period of lone working, click the Check In button on the app. Your local supervisor will then be able to see your location in case of an emergency.
When you are finishing your period of lone working, click Check Out and you will no longer be tracked by the system.
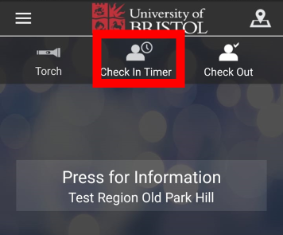
Using the Check In Timer button
If you have been asked to use the Check In Timer, you will need to actively check in after a period of time. If you do not check in, an alert will be raised.
Click on the Check In Timer button to start using it.
You will be prompted by SafeZone to set up an alert, which will send after a time period chosen by you. You can also add a note, such as stating you are in a specific room, or giving a responder extra information.
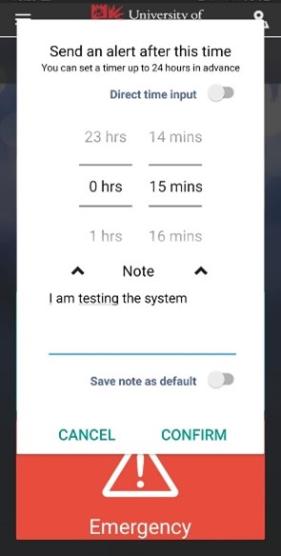
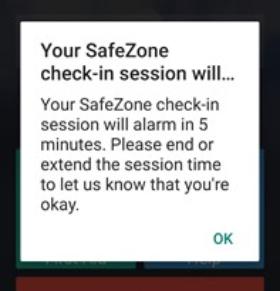
Once you have confirmed the time, the countdown will begin. Five minutes before the end of your session, you will be prompted to extend or end the alert. This prompt is accompanied by a noise.
Click OK and either check out or extend the timer.
If you do not check in, this will raise an alert with the first responder, as defined by your department.
Using Automatic Check In
Your phone can be set to Check In whenever you move into a designated region. In order to activate the feature, you must enable the Allow Automatic Check In option for SafeZone on your phone.
How to enable:
- Open the menu in the SafeZone app and select Settings
- Check the box marked Allow Automatic Check In
Notes:
- If you have activated Automatic Check In, you will receive a push notification each time your phone checks you in as you enter compatible regions.
- The Check In function sends location updates every 5 minutes.
- A single Check In session can last for up to 12 hours.
- You must be signed in to SafeZone.
- The Automatic Check In feature will keep working until you return to the settings screen and disable Allow Automatic Check In, which you can do at any time.
How to get the app
SafeZone can be downloaded:
- from the SafeZone website
- from the App Store
- from the Google Play Store
Once the app is downloaded, register yourself as a user by entering your University email address.
Frequently asked questions
Can we use SafeZone in our department or building?
All staff members at the University can download and use SafeZone.
What are the minimum requirements for installing SafeZone?
SafeZone can be installed on both iOS (Apple) and Android devices. Android should be running on version 6 or later (check through the Settings app on your device).
Why does SafeZone need to access my Motion & Fitness Activity?
The Motion & Fitness Activity permission allows the app to detect when you are moving and when you are stationary. This information allows it to pro-actively manage battery consumption so that, when stationary, location data is polled less frequently.
Why does SafeZone need to access my location?
SafeZone needs to access your location to allow you to Raise Alerts, Check In, connect Bluetooth devices and sign up, but your location is only shared when you Raise Alerts or Check In.
We recommend your location information is set to Always Allow Access.
Watch this video for more information on the permissions SafeZone needs.
Why do I need to Always Allow Access to location to Check In?
By always allowing access to location, you can check in and then continue to use your phone as normal. SafeZone will be running in the background but you can still make calls, send emails, and use the internet and other apps.
However, if your location data is set to only allow access while using the app, you will need to keep SafeZone running on your screen. This causes additional battery-drain and means you are not able to use your phone for other things.
Using the Always Allow Access setting does not mean your location is always shared with responders. Your location is only shared when you actively Raise Alerts or Check In.
Why does SafeZone need to send notifications?
In an emergency or major event, the University may need to send you Alerts through push notifications. These notifications may contain:
- information or instructions (in the case of emergencies)
- links to websites for further information
- a request to Check In
A Check In request would be sent so that response teams know your location and can send appropriate follow-up messages. For example, instructions to evacuate, lockdown or go to a specified area. It also allows the organisation to coordinate its response, and get responders to the right areas.
Will SafeZone use lots of battery?
SafeZone will only use battery when it is open and being used.
It has a number of features designed to optimise battery usage, such as the Motion & Fitness Activity detection feature, which limits the amount of location polling which is carried out (if allowed in your device’s permissions).
The app has different activity profile settings, but the default settings are recommended for most users.
Troubleshooting
I am on campus but it says there are no SafeZones in my area
You must use your University email address to sign into SafeZone (not a personal account).
If you do not have an email address for the University, you will have to be pre-registered by your system administrator to have access to the SafeZone features.
If pre-registered, you should have a message in your inbox with your email address and either a temporary password or instructions to use your standard University password.
I am not getting a verification email
Verification emails are required to confirm you have access to the email address that you are signing up for.
The most common reason for not getting a verification email is a typo when you set up your account. Please check your details and try to sign in again, and ensure that you use the complete email address: @bristol.ac.uk (rather than bris.ac.uk).
If there was a mistake in the original email, you will need to contact your system administrator, who will be able to remove the incorrect account. This is especially important if you sign in through Single Sign On.
If you do not know your administrator, you can contact SafeZone directly through Help & Support in the Contact section of SafeZone's website.
SafeZone is not working
You may think SafeZone is not working if:
- it is not letting you Check In
- it says that there are no SafeZone Regions available
- it keeps circling when trying to Check In
To Check In, you first need to be inside a SafeZone Region. A list of locations is available in the Regions section of the menu.
For the Check In to be successful, there needs to be data available (WiFi or network data) and the app needs to know your location within 200m. Android devices, especially, have a number of power saving options which reduce location accuracy.
Check that:
- Location Mode is set to high accuracy or similar
- Doze Mode or battery optimisation or is turned off for the SafeZone app. Find this by searching "battery optimisation" in your phone settings
- Google Play Services are turned on, because SafeZone utilises these to ascertain location
If you are still having issues, you can contact SafeZone directly through Help & Support in the Contact section of SafeZone's website.
Sometimes I haven’t been able to raise an alert with SafeZone
SafeZone will use whatever network is available to send an alert. There may be issues with connectivity if your phone is using mobile data, so try turning on WiFi.
If you allow SafeZone to send an SMS (check the permissions for your device), an SMS will be generated after around 10 seconds of failing to send via mobile data or WiFi. We recommend that this is enabled.
Finally, raising an alert will provide you with phone numbers for the security team and emergency services, and so if the alert does not send, you can attempt to call them directly.