The equations window in MLwiN
In MLwiN you can specify models in three different ways. The original command interface of MLn can be used - and in release 2.0 you will have to use this for certain advanced features. A system of dialogue boxes allows the equation for the model to be built up. Many users will wish to work mainly with the equations and the following screens show how this works.
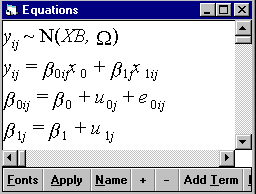
The screen above shows a 2 level random coefficient model with two explanatory variables, a constant, x0, with no subscripts and an explanatory variable with level 1 and level 2 subscripts indicating that it varies across each type of unit. MLwiN automatically decides what subscripts to use when you define a variable. Note also the Normal distribution assumption - this can be changed for generalised linear models along with a selection of link function. The second two lines define the random variables at each level.
We can change fonts, substitute names for symbols and expand the model further as shown below.
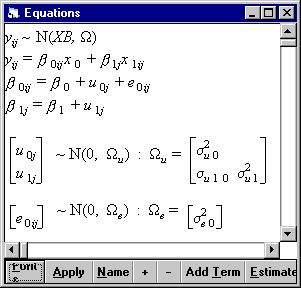
Selecting the + button brings up the covariance structure so completing the model specification. We can operate on any of the components of this model to make changes. For example, clicking on the level 2 variance of the coefficient of x1 and the associated covariance will remove them from the model.
Once the model is specified, we can start the iterations and watch the convergence take place, using a special trajectories window which monitors the values of each (or a selection) of parameters across iterations. The results, as iterations progress, can also be displayed in the equations window.
The equations window also links to other screens, such as that for carrying out predictions, where the same defined elements appear and can be manipulated.